| Long first marble thread post!!!!!May 29 2005 at 7:48 PM | 
James Stephens |
| I have been so excited to try the cimex with my marble package from Rick that I almost did not sleep last night. Well, today was the big day.uuuuuuuuuuuuhhhhhhhhhhhhhhhh what the hell was I thinking?
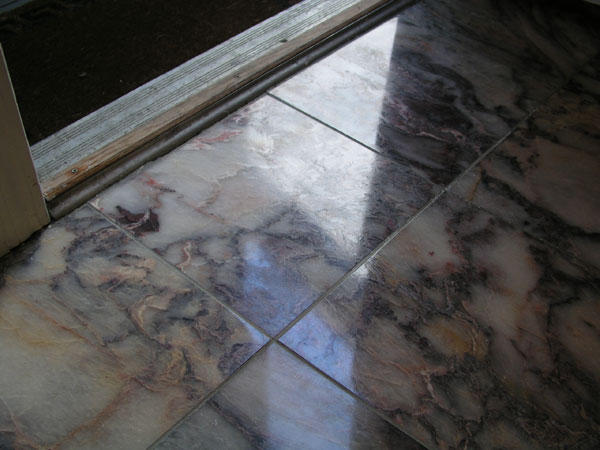
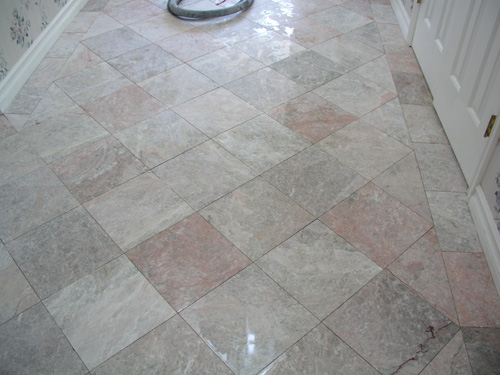
pix of floor
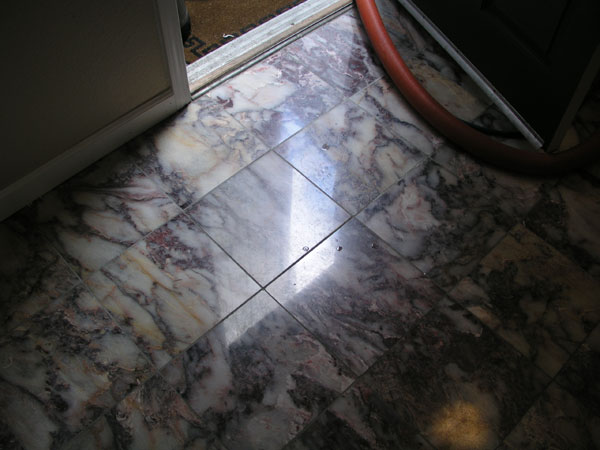
I decided to get brave and put some Stontech restore which is an acid to etch the marble
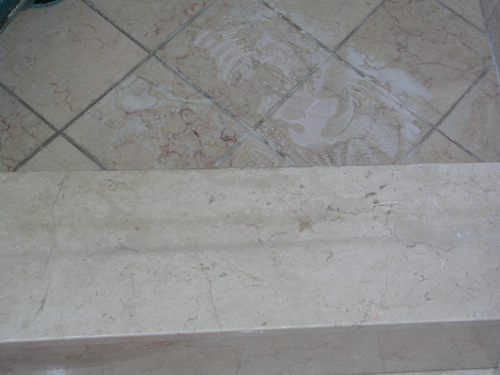
The floor had some lite scratches so I started with 500 and then went to 800.
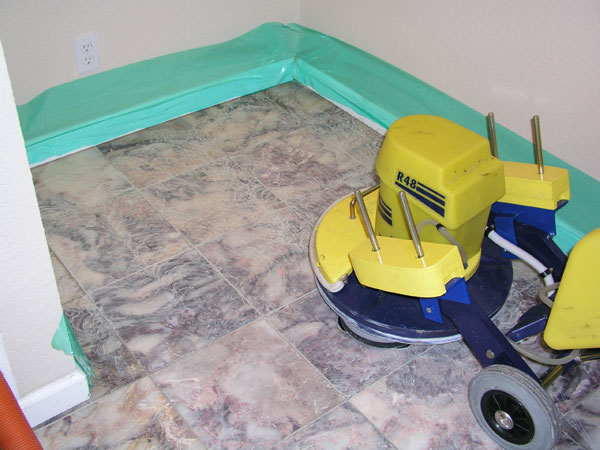
Here I am attempting to powder polish
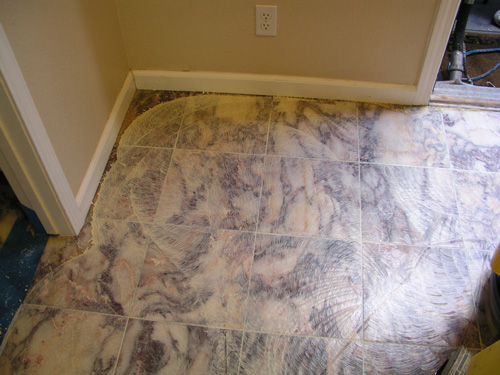
Final results.
OK, now for the ugly stuff.
PREP, PREP, PREP is the key. You short on prep than you are going to pay. I was so stoked and excited about this job. The honing of the floor turned out great, it was a piece of cake. However, I LET THE SLURRY DRY IN THE GROUT JOINTS and God what a pain to get it out with the truck set at 1000 PSI. I think I have already figured out to do small areas at a time before moving on.
God what a freaking mess. Words do not describe the dirty slurry mess, I was walking around, got all over the hoses, the cimex, the stairs and deck area when I wheeled it outside and even on the floor when I went to the polishing stage. Slurry was every where. Clean-up took some serious time. Plus, the diamond discs had dryed slurry in all the grooves and was a bitch to clean out.
So far so good. THEN COMES THE POWDER POLISHING. Everything was good up until then. I think I have the directions memorized on this. Disaster struck. Beecause this was my first time I followed the directions but the results IMHO sucked, I even did twice.
What on earth is going on? The directions state that the machine will start to bind up, my floor was dry as a bone and there was no binding up. I tried everything. Don't get me wrong, there were areas that looked real shiny but other areas that looked like ****. I sprinkled down 2-3 spoons of the marble powder etc. I spray buffed with new clean pads after that as well. And then I powder polished again. Look at my picture where the powder polishing is happening, is that what its supposed to look like. As far as the machine binding up, it did reach a point where the engine part was moving back and forth ever so slightly rather than smoothly like before but that was it. Also, in the honing process you stated that 5 passes were good, how many passes for the polishing aspect. I practically set the machine in one place for 5 minutes and the area did not look any different than any other place. Maybe my floor was a crappy marble??
After that, I did not follow the directions because I did not have ammonia on me but I must have rinsed this floor with 7-10 passes of water at 700 PSI and there was still haze all over, I could take my finger and wipe it up.
Everything was going so smoothly till I hit this process and damn, it created havoc. Maybe my expectations were to high. I thought I was going to have it look like a sheet of water was on it.
One positive note, the etching that I created was completely gone. You could not even see where I poured the acid. I was happy about that. However, I think that the polishing is going to make the lasting impression for the consumer.
I mentioned that I have two floors and a counter top on Tuesday but I am thinking about calling them and giving them some lame exuse. My confidence is SHOT!!!!!!!!!!!!!
James
ps. I now know what you guys make the big money doing it, LOL What a mess. I could not imagine doing this without the use of a truckmount or portable with high water pressure. WET VAC, hell no!!!!!!!!!
|
| | Author | Reply | 
James Stephens
| Last pix of final results | May 29 2005, 8:29 PM |
|
Rambo
| Re: Long first marble thread post!!!!! | May 29 2005, 10:04 PM |
I am anxiously awaiting Rick or his brothers response to this post. I really hate it when a job goes badly.
|
| David Gelinas
| Re: Long first marble thread post!!!!! | May 29 2005, 11:29 PM |
You got that right……when it comes to stone work it’s all about prep and time. You want to take your time doing your prep work and you want to take your time doing the actual floor work. I like that plastic you had there on the walls James. What was it and where did ya get it? The stuff I use I get at HD and it runs about $10 a roll, it comes 24” up the wall but doesn’t stick real well.
Yeh I cant believe I use to do stone work with a standard wet vac. It makes a world of difference using a porty. We just did a terrazzo job this week; I think it was about $3,700.00. We took our time on it and we spent just about 3 days on it. Most of one of those days was removing an unbelievable amount of lippage. This house was a fairly small cottage right on the Gulf of Mexico. I think it was probably built maybe in the 40’s. They bought it 5 years ago for 8 or 900,000 dollars and just the land alone now is worth about 2 million.
This floor was pretty cool; it had brass inlays every four feet. The only problem was that over the years the front part of the house settled and now ¾ of the way back across the living room there was an easy 1/4 inch ridge at one of the inlays that was about 8 to 10 feet long. As a point of reference a stacked a couple of pennies on top of each other and took a picture of them set up against the ridge. We were able to completely grind the floor flat, so that was pretty cool.
With regards to powder polishing I’ve done it booth ways, with a Cimex and with weighted & un-weighted slow machines. I have even given someone instructions over the phone that had never done anything at all with a marble floor before and it came out great: and he was using a 400 RPM Cimex to powder polish with. Stone work is not cut & dry, it requires a little bit of tweaking to do it. You need to take a general rule of thumb and then expound on it. All that being said it is something that is very doable and really not that hard or complicated. I can do it; and I aint nearly as smart as I looks, Rick ‘ill tell ya that. Different powders will respond slightly differently and different stones will also respond with a slight difference. First try it kinda dry and if that doesn’t work than try it a little wetter. On that terrazzo job we just did I had to play with it a little to figure out just how that floor was going to respond. What I ended up doing on that floor was sprinkled out the powder in about a 16 – 17” circle, sprayed that down with a little water, spread it around with the slow machine, worked it until it was just about dry, rewet it with more water than I had used originally and worked it until it was dry again. Then I moved on to the next section and let my guy buff off the residue with another slow machine, actually this one was a duel speed machine set at about 400RPMs just like the Cimex. While we were powder polishing, there was one point where I had to step outside and take a call that lasted 30-45 minutes, in the meantime I had my guy continue powder polishing; this was his first terrazzo job and only his third stone job ever. He ran one Cimex in the dining room and hall while I did the living room with a second machine. His diamond work and his powder polishing all came out great. I have another terrazzo job scheduled this next week, starting Tuesday, I’ll do all of my powder polishing with a 400 RPM Cimex if Rick has one a can barrow from him. I’ll take some pics of the job and I’ll even try and take explanatory pics of some of the procedures if I can if you guys would like.
David Gelinas
Marbleguy
|
| 
Rick Gelinas
| Re: Long first marble thread post!!!!! | May 30 2005, 12:28 AM |
Well said Dave! Thanks for your input.
James, there are variables with stone. Every stone is different. There are varying densities with different types of stone. Colors of marble react differently. BTW, dark stone is generally more difficult than lighter colored stone, and I noticed some black in the marble that you did. So, like a woman, every one of them is gonna be different. It adds to the mystique.
What I've put together with the instructions is the framework of what's involved. It's kind of like the skeleton of a marble care project. You will need to gauge what you do as you observe the actual floor that you're servicing. And as you follow the instructions you'll find that you have a pretty safe set of guidelines to get you into the ballpark. It's kind of like training wheels.
I'd have to say though James for a man who just bought a Cimex and was working through his very first carpet job just a couple of days ago - to go into a marble job is bold and fearless of you. Yet from the sound of it, you were still able to go in and pull it off with a degree of success. Not too shabby I'd have to say. Sure there's room for improvement, but experience will bring you that.
As you gain experience with the Cimex and stone care process will continue to get easier. But I'd have to say you're off to a good start since the finished results looked good.
And as Dave suggested, be sure to take your time. As you can see from the job he just did, he spent 3 LONG days on a small house, and he has a lot of experience. So take your time! This is not carpet cleaning. This is like going really slow, and then cutting back and going half that speed. If you think you're going too slow, you're going too fast. DO you get the picture? Watching paint dry is faster. Stone care requires patience and an eye for detail. However the payoff can be excellent.
So James, keep your chin up and be persistent, for a first job I'd say you did pretty well. Your next one will be all that much easier for you.
Rick Gelinas
encapman
|
| 
James Stephens
| questions | May 30 2005, 1:10 AM |
Dave, I got that wall paper for the side walls from www.magicwandco.com. It was $15.00 a roll(21 feet long I think). It did stick fairly well to the wall though, I did not have complaints about that.
Rick, I got bigger balls than brains, thats for sure. However, I am only going to learn one way though and that is by trial and error.
Maybe you two thought it looked good, there has to be a better way to get the haze off. I purchased the bonnett pads from you and it worked o.k.
MY QUESTIONS THOUGH THAT WEREN'T ANSWERED.
1. How many passes does it usually take to powder polish?(overlap? 10 passes?, I could not tell how the floor was looking until I rinsed and dried it off, is this normal?)
2. What do you mean by the machine binding up during the polish phase? It moved a little back and forth but not binding up like the machine was almost ready to quit?
Again, on a positive note, the etching came out and so did the scratches!!!!!!!!
Looking closer at the floor which did not show up in the pictures, the actual veins of the marble looked liked they were raised compared to the rest of the floor. Please ignore my lack of proper marble terminology.
James
|
| 
James Stephens
| Re: questions | May 30 2005, 1:24 AM |
So Dave, reading your post again on your floor example.
" What I ended up doing on that floor was sprinkled out the powder in about a 16 – 17” circle, sprayed that down with a little water, spread it around with the slow machine, worked it until it was just about dry, rewet it with more water than I had used originally and worked it until it was dry again."
I worked the polish for a couple of minutes, should I have tried more? If I were to overwet and it took me 15 minutes for the slurry to dry, would that be o.k.? Do you have to rinse it between and dry to see the actual results.
While I would always like 100% results, I at least want to know and sound knowledgable as i explain the variations in stone to my customers.
James
I know I will look back at this post in 6 months and laugh at my own ignorance.....
|
| David Gelinas
| Re: questions | May 30 2005, 10:07 AM |
Good morning James
With regards two your two questions:
1. How many passes does it usually take to powder polish?(overlap? 10 passes?, I could not tell how the floor was looking until I rinsed and dried it off, is this normal?)
As you powder polish each area you’ll want to overlap of course so there are no voids but when you’re working that small area you just keep working it all consistently. For instance that terrazzo job, like I said it was broken up by those brass inlays that formed 4X4 squares. I did each square as a section and as I did each section I over lapped the inlays about half a pad width to make certain there were no missed areas or voids. As you’re powder polishing, (WHILE IT’S STILL WET) you can kinda see through the slurry and see that the floor is starting to shine. Take a look at that floor you did, look closely at it. As your looking at it, think about the texture of an orange, you know how it’s not completely smooth; dose your floor in some areas look like that a little bit? The reason I ask is you said the veins are sort’a raised up. It sounds like you might have burned the floor with the powder.
2. What do you mean by the machine binding up during the polish phase? It moved a little back and forth but not binding up like the machine was almost ready to quit?
Most of the time, like you noticed with your Power Flight, powder polishing is vary demanding on the machine and also on the operator. The Cimex 400 rpm, being 1.5 hp and also being geared, is able to handle it a little better than most. Of course it is also going to depend how much powder you have built up on your pads too. Generally the more build up you have the greater the resistance. You also said about powder polishing, “Do you have to rinse it between and dry to see the actual results.” You can but that’s a lot of extra work & time. What some people will do is simply take a squeegee & pull a little bit of the slurry back to see what’s happening with the floor.
What grit diamond did you start with? It’s hard to see for certain, but the tile in the bottom left corner of the 5th pic; notice the bottom right corner of that tile. In the pic it looks a little rounded off or “Pillowed”. A pillowed effect is actually sometimes desired but in this case it looks as if those surrounding three tiles are still a little bit higher causing some lippage. This is also sometimes referred to as “Picture Framing”. It can be fixed by regrinding the area and feathering it out. You could start with something like a 50 grit diamond if it’s not too bad or Metalex or Grindex if it is more sever and then working your way through the rest of the grits.
When you first mentioned that you had three jobs scheduled, all for Tuesday, I thought it was a little much. I know speaking for myself personally; I wouldn’t want to stack them up on top of each other like that. You might consider going to two of them and saying that you already had one job scheduled and that it is going to take you longer than you realized so instead of you rushing through them all and not giving them the attention they will need you’d like to reschedule, just a thought. All of those points are true and it will give you an opportunity to not only save face, it will actually make you look more conscientious.
Give it sometime, you’ll get the hang of it. If I can help you anymore just let me know.
David Gelinas
Marbleguy
|
| 
Rick Gelinas
| Re: questions | May 30 2005, 12:40 PM |
James,
You know what's funny? You had a harder time with the powder polishing than with the grinding/honing. I've always felt that powder polishing was simpler than grinding. You aced the harder part and got stuck on the easier part. Must have been the teacher's fault 
So the teacher has gone back to the blackboard and I've re-written the section on powder polishing. I've attempted to make it even more failsafe.
What I'm trying to put together is a SIMPLE method for doing marble. A one size fits all plan. These instructions are a paint by numbers approach. But in the real world, you may use a wider palette (you may even draw outside the lines a little).
So you see, we're attempting to boil the whole process down and write "Marble Care For Dummies". That's not directed at you James. I love the "For Dummies" books. So what does that say about me? LOL
And that is why I really appreciate receiving the feedback. You're telling me where the instructions need to be clearer helps me see it better from a newbies eyes. Thanks for your help.
I think the revised instructions in the powder polishing section will make it even simpler and keep you out of the woods. Go gettem!
Check out the revised instructions:
http://www.excellent-supply.com/Marble-Care-Instructions.pdf
Rick Gelinas
encapman
This message has been edited by cimex on May 30, 2005 2:19 PM
|
|
| Mark Hart
| Re: questions | May 30 2005, 4:28 PM |
Hey Guys,
When I do a marble polish job. I take a squeegee with me. Polish until you see results. Use the squeegee to clear a small area in the slurry. You run the machine until you see the shine pop up. I may be as much as 15-20 minute. Don't do more than about 25 s/f at a time. When the shine pops, squeegee all the slurry to the next area and continue, adding polish & water as you need to. Have a separate bucket with cleaner to mop the completed area. James you said you sprinkled some powder and then polished. I assume you added water, right? Another tip: work in such a way that you don't go back on a finished area.
Just covering what I didn't see above.
This message has been edited by markahart on May 30, 2005 4:38 PM
This message has been edited by markahart on May 30, 2005 4:30 PM
|
|
| David Gelinas
| Well Said | May 30 2005, 8:03 PM |
Well said Mark. That’s it in a nutshell. It’s that easy.
David Gelinas
Marbleguy
|
| 
James Stephens
| Re: Well Said | May 30 2005, 11:37 PM |
David,
Yes the vains of the marble are slightly apparent, so maybe I over polished it. I will take both you and Marks comments about a squegee, that makes sense.
I started with 500 grit to 800 and then polished.
QUESTION: COULD I START WITH 50 GRIT FOR HEAVY SCRATCHES AND GO STRAIT TO 800 OR DO I NEED TO GO IN INCREMENTS???? 50-120-400-600-800 LIKE THAT?????
THE 4TH PICTURE HAS MY POWDER POLISH, DOES IT NEED TO BE MUCH DRYER THAN THAT OR IF I KEEP IT MOIST LIKE THAT, WILL IT JUST TAKE A LITTLE LONGER TO POLISH???
Tommorows jobs are next door neighbors so its hard to get past that one, plus the one has a marble countertop where she put a glass and left a round mark on the marble.
RICK, you are a damn good teacher, unfortunately you did not get the choose your student and I came along!!!!! You ever hear that joke about the young bull and the old bull sitting on the mountain top overlooking all the young female bulls.........???? I am the young bull. I really appreciate your help and quick attention. I am just very honest and straight foward, sometimes people get rubbed raw but I am who I am. Thanks.
Mark: excellent idea on the squegee, yes I put water down, probably not enough though at first because I thought the polish happens when the machine starts to bind up, so I used the water sparingly.
DURING THE POLISH PHASE, WOULD IT JUST TAKE LONGER TO POLISH IF I HAD USED TO MUCH WATER. I WOULD RATHER IT TAKE LONGER TO POLISH WITH USING TO MUCH WATER THAN TO NOT USE ENOUGH AND BURN THE FLOOR UP AND CAUSE RAISED VEINS IN THE MARBLE????
Tommorow is coming soon, you guys are starting to re-instill confidence in me.
James
|
| 
Rick Gelinas
| Re: Well Said | May 31 2005, 12:03 AM |
You're learning well Young Jedi.
James, using a squeegee will help you with powder polishing. I regret that I overlooked putting that into the instructions right off the bat.
Regarding your question about what grit to start grinding with. Start at 50, go to 120, then to 220, then to 400, then to 800. Do not skip a grit. Once you have gained a lot of experience it may be possible in isolated circumstances to start at 120 or 220 under unique conditions where the floor is nearly perfect to begin with (but how many nearly perfect floors are we called upon to service).
Mark's suggestion is accurate about polishing until you see the shine pop, which may take as much as 15-20 minutes.
All in all, get back on your horse and approach the next floor with some adjustments and you should be fine. If you will follow the instructions that we’ve outlined to the letter, I believe you’ll see good results with little exception.
http://www.excellent-supply.com/cimex-marble-instructions.htm
Wishing you all the best!
Rick Gelinas
encapman
|
| 
James Stephens
| wish me luck! | May 31 2005, 10:17 AM |
Rick, this is a learning experience not just for the student, but the teacher as well.
The horse is at the gates and ready to go. I may not do both the floors I had wanted to do this afternoon, but at least I am going to attempt one of them. Camera is on hand. If you have any last minute tips that may have been overlooked, give me a holler 408 252-5402.
James
|
|
Doug Payne
| Re: wish me luck! | May 31 2005, 6:53 PM |
let me tell you what, i was on the phone with dave and another buddy of mine quiet a while last weekend on my 1st job.....wooooooieeeeee what a rush...what a sick feeling when you put those coarse disks on a marble...i was litteraly ready to puke...but when all was said and done the custy was happy and so was i....
had a few scratches by the walls were i got to close, but oh well....like i said the custy was happy...and now i got a board room table to do for them this week as well....man oh man are we beggin for it or what
|
| 
Rick Gelinas
| Re: wish me luck! | May 31 2005, 9:38 PM |
Kewl Beans Doug!
Glad to hear our paint by numbers system worked out well for you.
Keep up the good work! Please keep us posted.
Rick Gelinas
encapman
|
| 
James Stephens
| Re: wish me luck! | June 1 2005, 12:26 AM |
Better yet, How about you tell me what you did!!!!!!
|
| | Current Topic - Long first marble thread post!!!!! |
| |
|
|